SORGHUM CHAPATI / Easy Breezy Gluten Free, puffed another Eureka moment !!!!!

Life is all about balance and yes I am talking philosphy as it pertains to our everyday life , even when cooking in the kitchen. In the process of using different gluten free flours for making chapatis some like quinoa flour are a HIT others are a MISS, well not really as I do not give up easily when it comes to cooking. So today I bring you Sorghum chapatis.

Sorghum originated in Africa thousands of years ago, and then spread through the Middle East and Asia via ancient trade routes, travelling to the Arabian Peninsula, India and China along the Silk Road. Today sorghum remains a staple food in India and Africa, and is growing in popularity in America. It’s the third most important cereal crop nationally and the fifth most important around the world.

Sorghum flour is a powerhouse of nutrition and adds great flavor to gluten-free baking. It is high in protein, iron, and dietary fiber, making sorghum flour welcome in pantries around the world. Sorghum flour is high in antioxidants, which support cardiac health. In addition, the starch and protein in sorghum take longer than other similar products to digest. Since it ltakes longer to digest it is great for a diabetic diet.

As a rule I do not like to mix different flours for many reasons, one of them being one kind may agree with you more than the other. Sorghum flour is not an easy grain to work with, dry and crumbly like the dry and arid climate it grows in, the dough breaks as you try to roll it. In certain parts of India where it is a staple grain lot of ghee or oil is used along with some water to moisten the dough and flatten it with the palm (that is also the reason, the grain considered a heating grain is eaten in colder months ). It is very difficult to roll it on a board. Even to flatten it with your palm requires lot of practice and skill. Well to cut the long story short I have added very small quantity of amaranth flour which is dense and rolls very easily to balance the dry, crumbly sorghum. It worked so well that it is now another Easy Breezy Gluten Free !!! Eureka moment.

These are small but very satisfying feel GOOD ( literally !!! ) in your gut victories !!!

Ingredients

1/2 cup sorghum flour

1 1/2 tbsp. amaranth flour

water to knead the dough

a pinch salt

  • 1 tsp. Oil
  • Little dry quinoa or sorghum  flour to roll the chapatis
  • Little ghee or butter to apply on the chapatis

Tools

  • Rolling pin
  • Marble or wooden board
  • Cast iron or non stick skillet

DSC_0142

DSC_0141

DSC_0140

DSC_0145

Method

  1. Continue to add the water in small quantities till the dough starts to come together and is not wet.
  2. The dough is ready when it starts to peel off your hands. Grease you palm and knead the dough some more to make it more pliable.
  3. Make a round ball and let it sit for half an hour or more.
  4. Divide this dough into 4 -6 balls of equal size. Meanwhile heat a seasoned cast iron griddle or nonstick skillet.
  5. Roll the ball between both your palms and make a smooth ball (it would not be smooth like wheat flour dough as there is no gluten but adding the Amaranth flour makes the dough  more pliable )
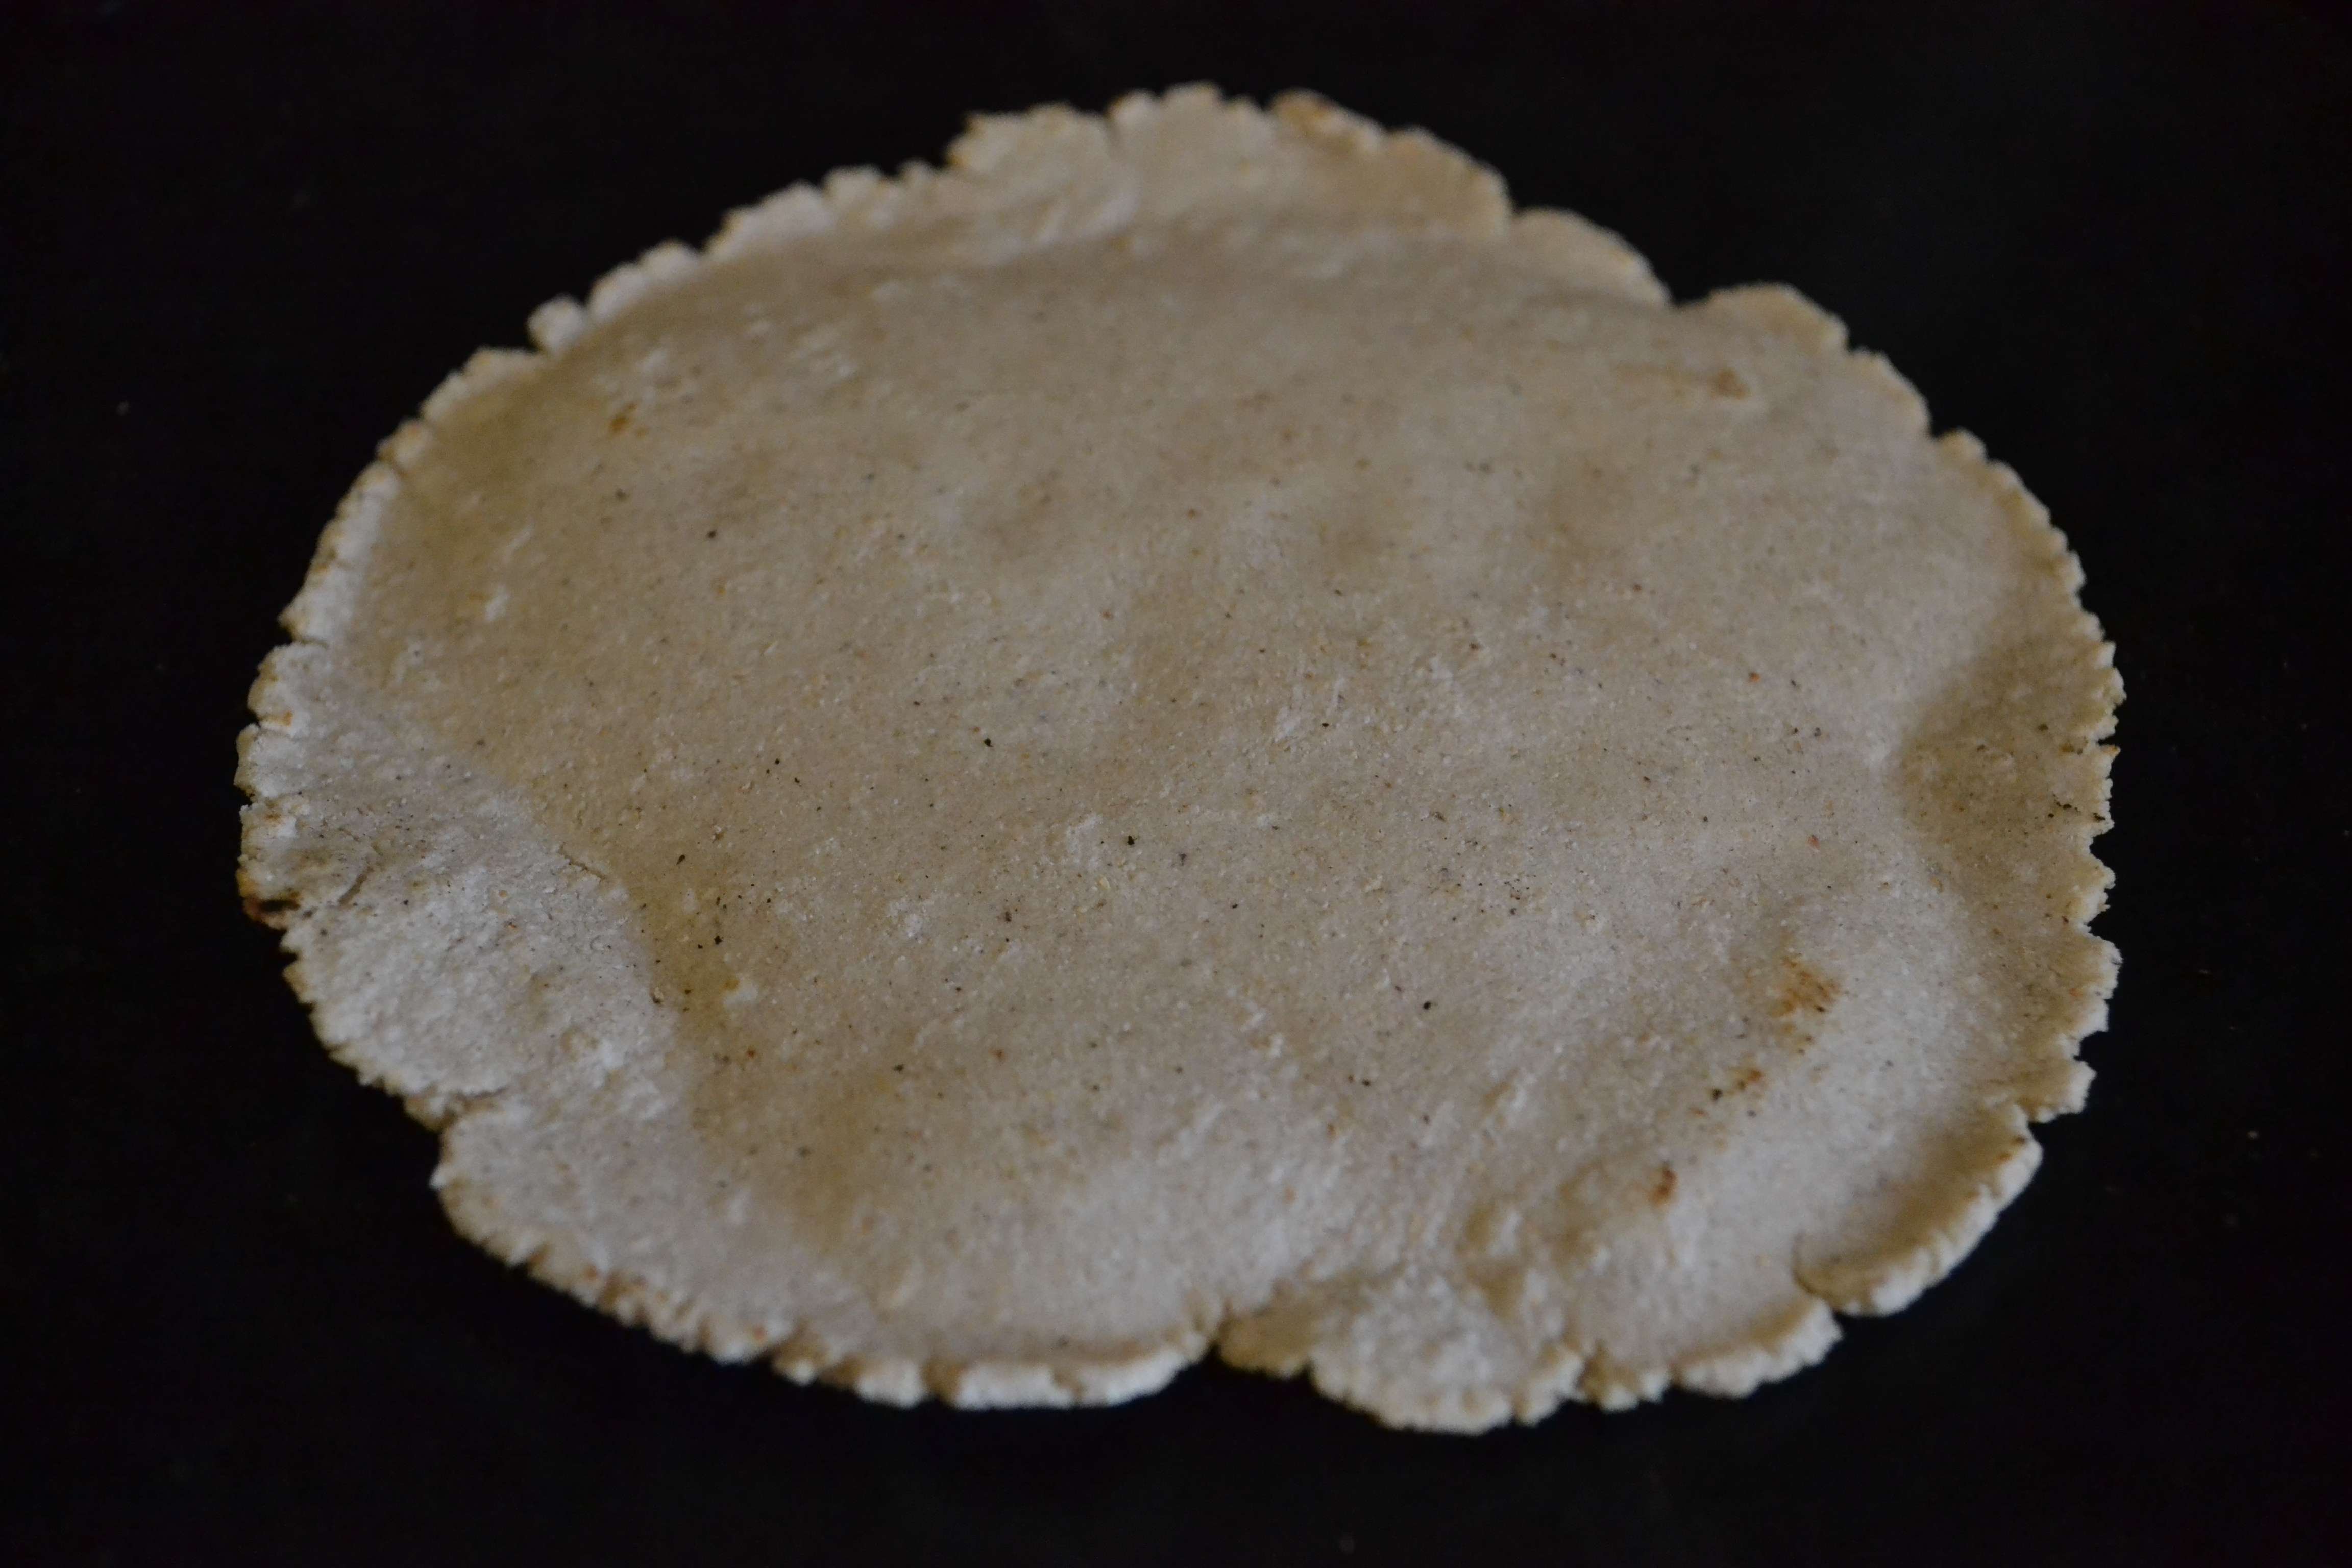
  6. Roll the ball in dry flour and with a rolling pin carefully roll it out an inch or two and carefully peel it off the board and roll it in dry flour again. Adding amaranth flour makes the dough very easy to roll and it does tear as easily .
  7. Carefully continue to roll and repeat the above step till you have a circle of 3-4 inch diameter of even thickness. Use a spatula and carefully peel it off the board. The edges are not as smooth as that of wheat flour or Quinoa but you can cut the frayed edges with a knife to give it a smoother look.
  8. Do not be disheartened if the chapati does not come off the board or tears while doing that. Few attempts are necessary before you get nice soft, smooth  chapatis.
  9. Put the rolled chapati on the heated griddle ( it should be on medium heat )
  10. After  20 seconds or so when the chapati loses its wet look, turn it on the other side, let it cook for another 20 seconds and you small bubbles turn it again, if the chapati is rolled evenly and without any tears it will puff up (may puff up partly).
  11. Use a paper towel or a clean dish towel to press the thicker edges so that they are well cooked .
  12. Normally a traditional whole wheat chapati is cooked in the 3 steps described above but sorghum chapati needs to be turned more than few times before it is well cooked.
  13. Once cooked, you may apply butter or extra virgin olive oil, or ghee and wrap in a soft cheese cloth and put it in an air tight glass or metal container. When enclosed fresh and hot in the container in the steam they stay soft.

Enjoy !! Serve with plain yoghurt, curries and salad.

Sophia’s Scrumptious Baklava

Hope everybody had a fabulous Mother’s Day. The recipe for today is a rich, decadent homemade baklava recipe contributed by my friend Maryanne’s mother Sophia; A wonderful mother and a fabulous cook who has always treated me as her own and makes sure like all wonderful, beautiful generous mothers that I always leave her home with delicious and wonderful goodies. Please enjoy making this recipe. It is time consuming labour of love but so worth it.

Ingredients:

Note:  This recipe makes a large quantity of baklava.  If you keep it in an air tight container and refrigerate it, the baklava will last for a long while.  Just check it once in awhile to make sure that it isn’t drying out.  Freezing the baklava is not recommended, because it loses it’s “crunch”.3 Boxes of Refrigerated Fillo dough.  Purchase the thinnest version, that you can find.  Some say “for pastries” on the box.
We use “7 Days Baking” brand.  If you can’t find this brand, then use what is available in your area.
5 heaping cups of walnuts, finely chopped (in a food processor)
5 heaping cups of almonds (with skins), finely chopped  (in a food processor)
1 cup of brown sesame seeds, finely ground (in a coffee grinder–a food processor will not work).1 tablespoon ground cinnamon.grape seed oil–to use for brushing the Fillo with.A 16.5 inches X 13.5 inches baking pan ( or any size really as long as the roll fits lengthwise).

Parchment paper to line the pan with.

a pastry (paint) brush in order to brush the fillo with.

Syrup Ingredients:

2 1/2 pounds (approximately) of creamed honey.

1 stick of cinnamon.

5 or 6 cloves

1/2 lemon (zest and 1 tablespoon lemon juice).

1/2–1 cup of raw sugar  (optional)

Directions:

1.  Combine nuts, sesame seeds and cinnamon in a bowl.

2.  Cover Fillo with damp tea-towel to prevent drying out until you are ready to use it.

3.  Put some of the oil in a bowl and take out your brush.

4   Line the pan with parchment paper.

5.  Take 2 pieces of fillo and place one on top of the other.  Brush the top piece with grape seed oil.  Then liberally sprinkle (by hand) the
filling over the dough.  Don’t overdo it, you should be able to still see “white” space.

6.  Take another 2 pieces of fillo and place them over the first two.  Brush the top piece with grape seed oil.  Again, liberally sprinkle the
filling over the dough.

7.  Fold in both the left and right sides, about 1 finger’s width.  This prevents the filling from falling out when you roll the fillo dough.  Brush
the sides with oil.


8.  Now, you will roll the fillo from the bottom as tightly as you can, without “ripping” it.  When you have finished rolling the dough with the
filling, brush the top of the roll with more oil.  Place the finished roll in the pan.

9.  Repeat the process until your pan is full.  If there is spill-over ( if you have more rolls of pastry) you can put more of the rolls in another
pan.  If your pan is full and your fillo is finished, but not the filling, then you can freeze the filling and use it at another time.

10. Make sure that you cut the Baklava roll diagonally, with a knife, before you place it in the oven or it will crumble when you try to cut it after it is cooked.

11.  Preheat oven at 350F for 15 minutes.  Place the pan on the middle rack.  Bake between 45 minutes to 1 hour.  The Baklava must be golden brown when it is ready.

Sophia Secret:

     At about the half an hour mark, check the Baklava for colour.  If it looks ready, cover the pan with parchment paper until the appropriate cooking time is reached.  If you take it out too soon then the inside of the Baklava will be mushy. 

After you have turned off the oven, you can also leave the Baklava in the hot oven-covered with the parchment paper, for another 5 to 10 minutes.

Take out the Baklava and let it cool down completely before you drizzle it with the syrup.  Make the syrup only when you are ready to use it.

Syrup

Using a vegetable peeler, peel the rind thinly from 1/2 a lemon. Place creamed honey in a small pot and melt over low to medium heat.  When the honey has melted, skim the froth off the top.  Add the lemon rind and the spices, and the sugar (if you want).  Turn down the heat to about a simmer and let everything cook for another 5 minutes.  Add 1 tablespoon of lemon juice, just before you turn off the stove.  The lemon juice will prevent the honey from “hardening” again.

Enjoy!

Kale with Yellow Lentils

“LET FOOD BE THY MEDICINE AND MEDICINE BE THY FOOD”  – HIPPOCRATES

KALE with YELLOW LENTILS

A colorful dish full of Calcium and vitamins

IMG_20130309_141331

INGREDIENTS                                                         (Serves 4-6)

1 bunch kale leaves thoroughly washed & chopped fine (separate the stems from leaves)

Leaves are curly so make sure you wash all the dirt thoroughly under running water

1 cup yellow or pink lentils rinsed few times and soaked in 1 1/4 of water

2 green chillies washed and slit lenghthwise

2 cloves of garlic finely chopped

a pinch of asafoetida

1-2 tbsp.of extra virgin olive oil or ghee

1 tsp. turmeric

salt to taste

juice of 1/2 lemon or lime

Method

1.On medium heat cook the soaked lentils in 1 1/4  cup of water with green chillies and a pinch of asafoetida.

2.cook for approx. 20 min. till the lentils are cooked through but each grain is separate.

3.Now arrange the stems of kale and then the leaves on top of the lentils and cover the pan.

4.Let it cook for 6-7 min. the kale should be bright green and glistening.

5.Now you can mix the lentils and kale thoroughly , keep it covered for few more minutes.

6.Before serving add salt and lemon juice and oil .

7.Mix thoroughly and enjoy!!!!!!!

SERVE IT WITH SPICY SAMBHAR OR RASAM OR SPICY DAAL AND RICE!!!!!